Dermatology Referrals - how to take a photograph
Skin conditions are one of the most frequent reasons for visiting a primary health care facility. Approximately 80% of dermatological consultations performed by GPs concern common skin conditions, which can be adequately managed in the primary health care (PHC) setting, without the need to consult a dermatologist
If you require an appointment for a skin complaint, you will be asked to attend for a face to face appointment for assessment. If however you are unable to attend the surgery and would instead like to be assessed via telephone triage, you will be asked to email photos to the practice for the GP to review prior to your consultation - Data.W97611@wales.nhs.uk
Below is an image guide on how to take the best photographs to help aid in the diagnosis and treatment of your issue. Further information and step by step instruction can be found further below.
Getting ready
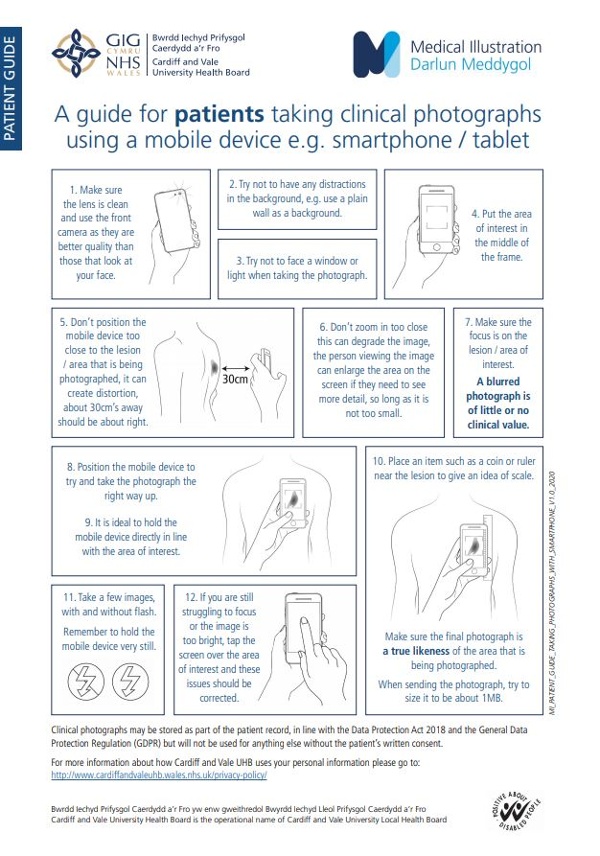
- You can use a phone camera or digital camera. If using a phone use the main camera not the “selfie” camera. The icon to switch between the two is shown in image 1
- Find an assistant - it’s much better if someone else takes the photo
- Move to a bright area with lots of natural light, but avoid direct sunlight. Turn off the flash. A flash can light up the skin unevenly (image 2)
- Make sure the area to be photographed is held still, ideally by resting it on a surface (image 5) and trying to hold still. Resting a foot on the floor makes it much easier to focus (image 6)
Taking the photo
- We need 3 photos for each lesion.
- An orientation photo - stand 1 metre away from the area of interest and take the photo. This shows where the problem is and how big an area it covers. Try to show the whole area affected if it is a rash, including both sides of the body if possible - by showing both elbows (image 7) we can see that the rash only affects one side
- A close-up photo - move your camera 10-12cm (4-5in) from the skin problem. On most phones you can touch the part of the screen you want the camera to focus on. If you get too close the camera won’t be able to focus. The focus is the most important thing - don’t worry about getting really close, as close as you can get in order to achieve a sharp focus is all you need. For the close up photo it is often better to have the light source coming slightly from the side, to highlight any change in skin texture. In image 8 the camera is too close to the skin to focus on the lesion. In image 9 the light coming from the side lets you see the surface of the lesion much better
- A sideways on photo for a raised lesion - if the lesion is raised then a sideways on photo can be very helpful
- Make sure the size of a skin lesion is clear either by putting a coin or ruler in the photo (image 10), or by taking the photo from a little further away. Don’t cover up the lesion with the coin (image 11)
- Take a few photos and only send the best. Check that the image/s are in focus and easy to see. The skin lesion or rash needs to look the same on the screen as it does in real life. If you are only able to send one photo of a skin lesion, then a close up photo is best
Sending the photo
- Only send the best photos of each skin lesion/rash, as above
- Make sure you have put your name and date of birth into the email message or online platform - email the practice at Data.W97611@wales.nhs.uk
- It is usual for all photos to be stored in your medical records - if you do not want for any photo to be stored, then you should speak to the clinician BEFORE sending any pictures